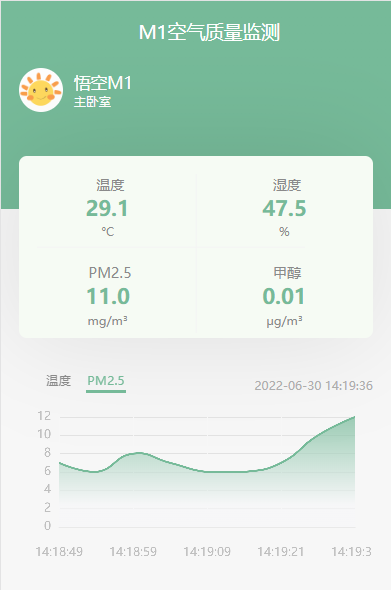
Phicomm悟空M1官方服务器关闭,WIFI图标一直闪烁,最开始只是想写个监听9000端口的服务器,让它的WIFI图标不闪,后来写着写着就加上了把获取的数据保存到MYSQL,再后来,即然都保存到MYSQL了,干脆再写个前端吧. Python小白,代码比较乱. ### **GitHub:[传送门](https://github.com/fenggenet/PhicommM1_Server "传送门")** ### **悟空M1连接WIFI:[传送门](https://mrhao.net/archives/134/ "传送门")** ### **修改路由器DNS自定义HOSTS** 127.0.0.1 aircat.phicomm.com 请修改127.0.0.1为PhicommM1 Server的IP地址 **前端截图** ------------  ## **安装必要环境** 在Docker上创建Python容器,端口映射9000和5000的TCP端口,9000为M1监听端口,5000为前端访问端口. 然后在终端上安装下面模块: ```shell pip install Flask ``` ```shell pip install sqlalchemy ``` ```shell pip install pymysql ``` ```shell pip install mysql-connector ``` ```shell pip install pytz ``` ## **安装PhicommM1 Server** ```shell cd /usr/local ``` ```shell git clone https://github.com/fenggenet/PhicommM1_Server.git ``` ## **修改MYSQL配置** 进入PhicommM1 Server目录 ```shell cd PhicommM1_Server ``` 修改You MySQL Host IP为你的MYSQL服务器地址 ```shell sed -i 's/^HOSTNAME.*\+=.*/HOSTNAME = You MySQL Host IP/' common/sql.conf ``` 修改You MySQL Host Prot为你的MYSQL服务器端口 ```shell sed -i 's/^PORT.*\+=.*/PORT = You MySQL Host Prot/' common/sql.conf ``` 修改You MySQL DataBase为你的MYSQL数据库名称 ```shell sed -i 's/^DATABASE.*\+=.*/DATABASE = You MySQL DataBase/' common/sql.conf ``` 修改You MySQL UserName为你的MYSQL服务器用户名 ```shell sed -i 's/^USERNAME.*\+=.*/USERNAME = You MySQL UserName/' common/sql.conf ``` 修改You MySQL Password为你的MYSQL服务器密码 ```shell sed -i 's/^PASSWORD.*\+=.*/PASSWORD = You MySQL Password/' common/sql.conf ``` ## **运行** ```shell chmod a+x ./run.sh ``` 访问前端: http://YouIP:5000 最后修改:2022 年 07 月 01 日 © 允许规范转载 赞 如果觉得我的文章对你有用,请随意赞赏
2 条评论
兄弟有联系方式吗 我想学习一下这个
已经开源在github上了,也是纯新手,代码比较乱.